
You are using an out of date browser. It may not display this or other websites correctly.
You should upgrade or use an alternative browser.
You should upgrade or use an alternative browser.
Tutorial photoshop Indonesia, trik cara cepat maupun cara alternatif anda. Belajar edit adobe photo shop bersama gratis
- Thread starter Administrator
- Start date

Muh.Ridwan
New member
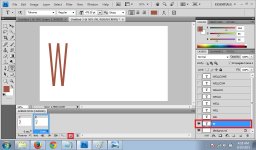
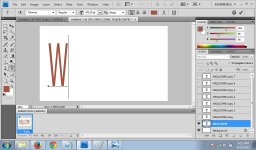
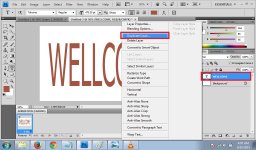
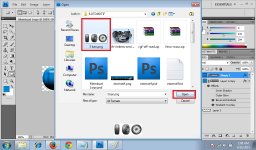
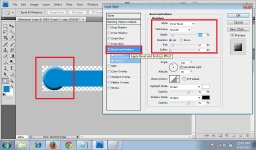
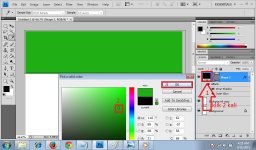
Membuat gambar bergerak gif
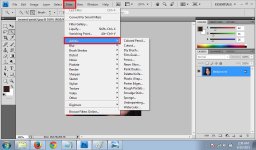
open the image
klik: Window > Animation

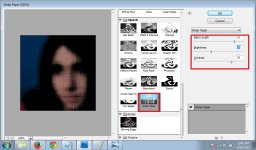
klik: Duplicate layer

klik hilangkan mata sementara

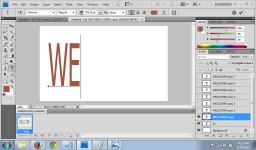
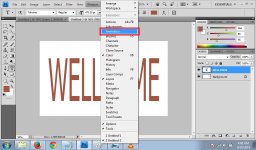
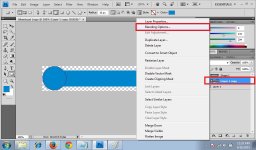
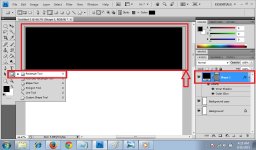
setting agar layar berurutan seperti sedang mengetik

lanjut seperti tadi

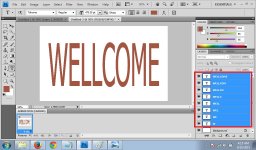
hingga berurutan seperti ini

klik: Duplicate selected frames disamping kiri
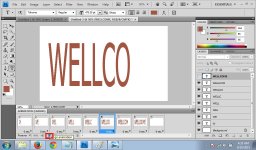
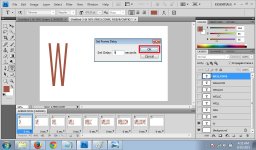
gandakan layar dengan klik Animation Frames ada dibagian bawah, setelah muncul, lalu ganti dengan frame atau gambar lain disamping kanan dengan berurutan seperti mengetik

lanjut

lanjut

hingga selesai semua

open the image
klik: Window > Animation
klik: Duplicate layer
klik hilangkan mata sementara
setting agar layar berurutan seperti sedang mengetik
lanjut seperti tadi
hingga berurutan seperti ini
klik: Duplicate selected frames disamping kiri
gandakan layar dengan klik Animation Frames ada dibagian bawah, setelah muncul, lalu ganti dengan frame atau gambar lain disamping kanan dengan berurutan seperti mengetik
lanjut
lanjut
hingga selesai semua
Attachments
-
 GIF 10.jpg173 KB · Views: 157
 -
 GIF 9.jpg143.4 KB · Views: 151
 -
 GIF 8.jpg139.3 KB · Views: 156
 -
 GIF 7.jpg137.8 KB · Views: 121
 -
 GIF 6.jpg156.1 KB · Views: 138
 -
 GIF 5.jpg142.3 KB · Views: 134
 -
 GIF 4.jpg140.4 KB · Views: 204
 -
 GIF 3.jpg160 KB · Views: 288
 -
 GIF 2.jpg167.5 KB · Views: 202
 -
 GIF.jpg142.1 KB · Views: 204
Last edited:
Muh.Ridwan
New member
Muh.Ridwan
New member
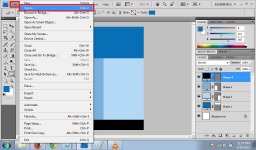
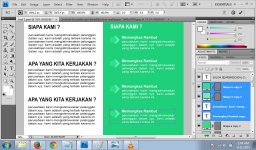
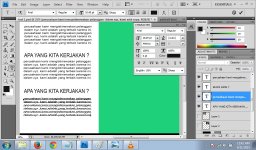
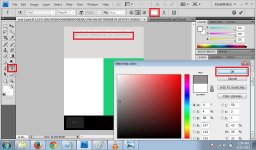
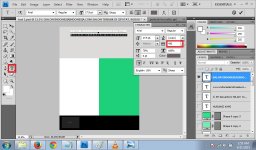
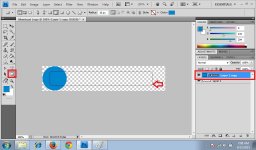
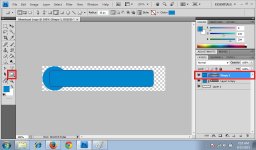
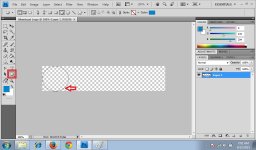
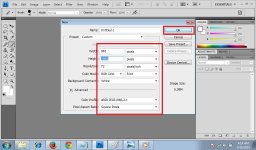
Membuat struktur untuk design seperti majalah
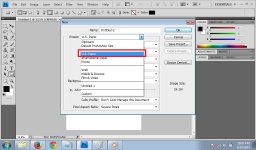
FILE >> NEW

Setting PRESET >> U.S.PAPER

Setting semua seperti ukuran majalah

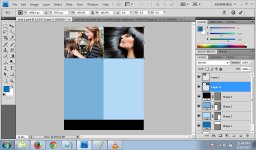
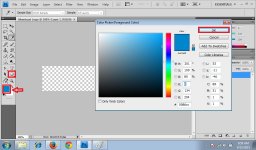
gunakan Rectangle tool

Color picker >> ubah warna sesuai yg km inginkan

kita buat kotak


buat lagi untuk layar 2

anda juga dapat mengganti warna lain dengan klik kiri 2 kali dgn mouse pada layar

selanjutnya anda dapat menambah lagi seperti tadi

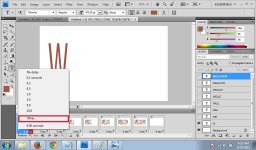
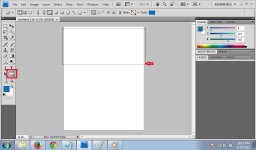
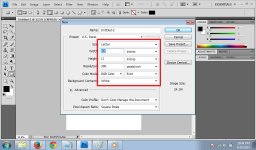
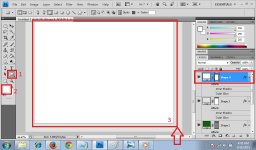
FILE >> NEW
Setting PRESET >> U.S.PAPER
Setting semua seperti ukuran majalah
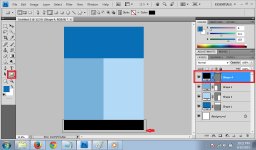
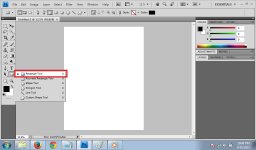
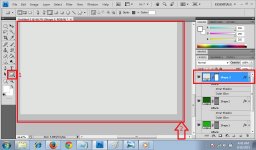
gunakan Rectangle tool
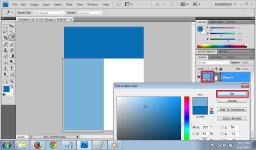
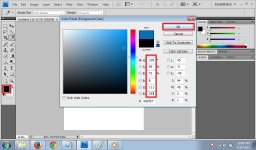
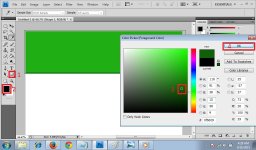
Color picker >> ubah warna sesuai yg km inginkan
kita buat kotak
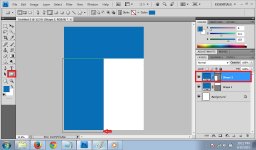
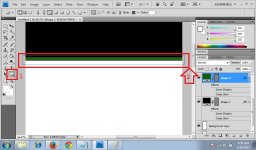
buat lagi untuk layar 2
anda juga dapat mengganti warna lain dengan klik kiri 2 kali dgn mouse pada layar
selanjutnya anda dapat menambah lagi seperti tadi
Attachments
-
 test 10.jpg119.9 KB · Views: 119
 -
 test 9.jpg127.2 KB · Views: 98
 -
 test 8.jpg114.2 KB · Views: 107
 -
 test 7.jpg94.9 KB · Views: 95
 -
 test 6.jpg94.2 KB · Views: 123
 -
 test 5.jpg132.6 KB · Views: 121
 -
 test 4.jpg101.2 KB · Views: 125
 -
 test 3.jpg146.3 KB · Views: 155
 -
 test 2.jpg145.5 KB · Views: 105
 -
 test.jpg113.2 KB · Views: 110
Muh.Ridwan
New member
Terusan yang diatas
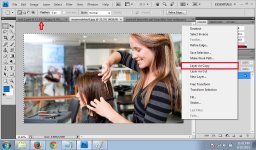
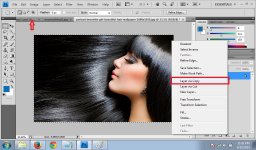
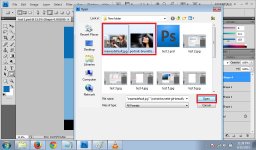
Menambahkan gambar
cari foto kualitas bagus sesuai judul yang mau kamu bikin

jika sudah dapat, lalu FILE >> OPEN

OPEN gambar yang anda pilih

Layer via copy gambar ke Paper yang kamu buat


lalu rapihkan

Menambahkan gambar
cari foto kualitas bagus sesuai judul yang mau kamu bikin
jika sudah dapat, lalu FILE >> OPEN
OPEN gambar yang anda pilih
Layer via copy gambar ke Paper yang kamu buat
lalu rapihkan
Attachments
Muh.Ridwan
New member
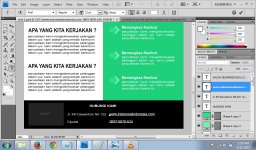
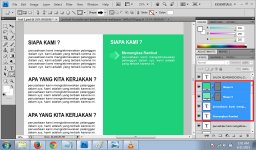
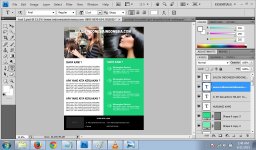
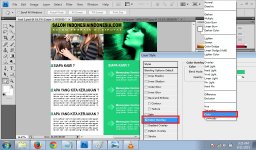
Terusan design majalah
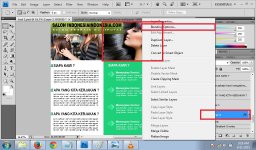
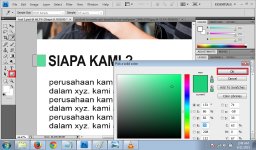
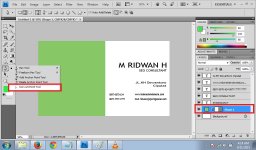
Menambahkan Text
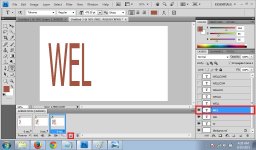
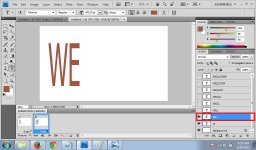
Kita Kltik Text, untuk memberi judul
dan kli CTRL+T untuk mengatur ukuran lebar text

kamu juga dapat mengubah warnanya supaya lebih elegant

ketik text sesuai tema diatas

Klik Custom Shape Tool, lihat dibagian atas ada item2 pilih salah satu laltu edit sesuai selera

block layar yang mau di duplicate

duplicate layar agar ukuran text 1 dan yang lainnya sama dan rapih


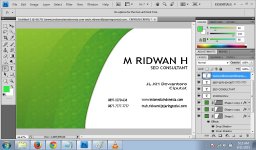
isi alamat dan kontak

Klik tanda mata pada gambar yang disembunyikan tadi, kita Test
HASIL

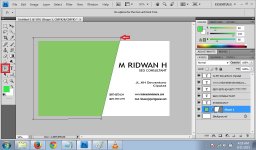
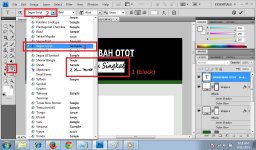
Menambahkan Text
Kita Kltik Text, untuk memberi judul
dan kli CTRL+T untuk mengatur ukuran lebar text
kamu juga dapat mengubah warnanya supaya lebih elegant
ketik text sesuai tema diatas
Klik Custom Shape Tool, lihat dibagian atas ada item2 pilih salah satu laltu edit sesuai selera
block layar yang mau di duplicate
duplicate layar agar ukuran text 1 dan yang lainnya sama dan rapih
isi alamat dan kontak
Klik tanda mata pada gambar yang disembunyikan tadi, kita Test
HASIL
Attachments

Last edited:
Muh.Ridwan
New member
terusan
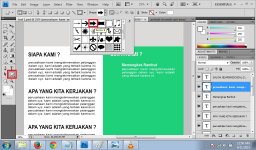
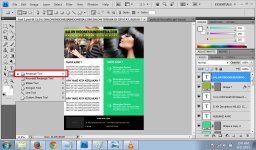
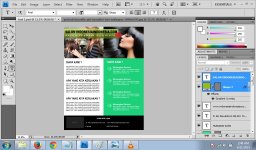
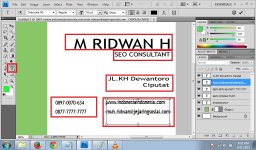
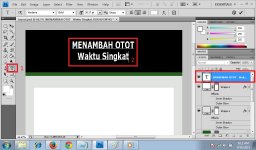
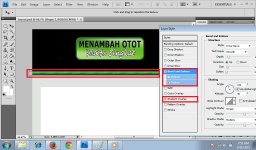
Sempurnakan Hasil
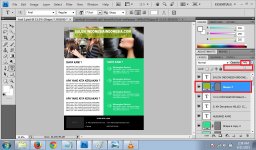
klik rectangle tool

buat kotak pada belakang text judul

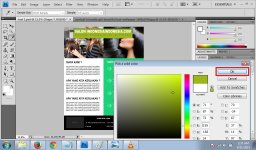
pilih warna lalu OK

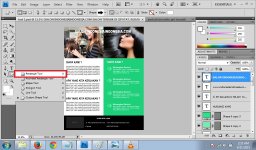
atur pada layar agar sedikit transparant

klik 2 layar lalu tarik judul geser ke kiri

klik rectangle tool lagi

buat item pada menu text

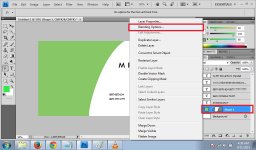
klik layar gambar wanita lalu >> blending option

Color Overlay >> color dan copy warna bagian bawah agar hasilnya mirip dengan warna dibawah

Hasil

Sempurnakan Hasil
klik rectangle tool
buat kotak pada belakang text judul
pilih warna lalu OK
atur pada layar agar sedikit transparant
klik 2 layar lalu tarik judul geser ke kiri
klik rectangle tool lagi
buat item pada menu text
klik layar gambar wanita lalu >> blending option
Color Overlay >> color dan copy warna bagian bawah agar hasilnya mirip dengan warna dibawah
Hasil
Attachments
-
 bagus 10.jpg177.9 KB · Views: 101
 -
 bagus 9.jpg214 KB · Views: 117
 -
 bagus 8.jpg219.3 KB · Views: 94
 -
 bagus 7.jpg186 KB · Views: 99
 -
 bagus 6.jpg190.7 KB · Views: 98
 -
 bagus 5.jpg177 KB · Views: 92
 -
 bagus 4.jpg179.9 KB · Views: 91
 -
 bagus 3.jpg175.6 KB · Views: 84
 -
 bagus 2.jpg180.4 KB · Views: 85
 -
 bagus 1.jpg190.5 KB · Views: 80
Muh.Ridwan
New member
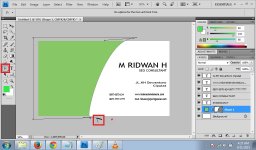
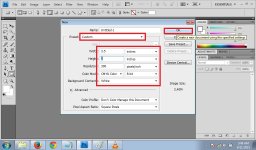
DESIGN KARTU MEMBER/BISNIS
FILE >> NEW Setting paper seperti ini

KLIK RECTANGLE TOOL

buat text Nama,Jabatan,Alamat,No Hp,Email

klik 'Convert Point Tool

tarik geser sambil klik CTRL

buat lengkungan >> klik geser tanpa klik CTRL

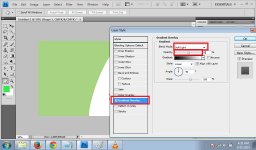
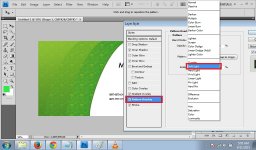
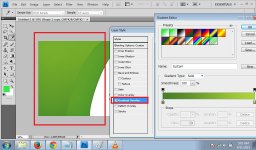
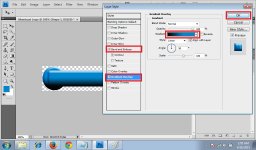
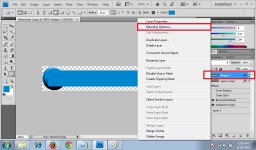
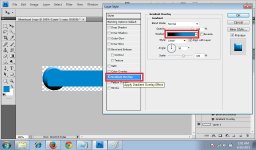
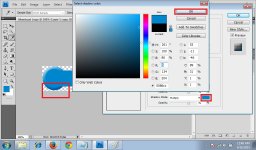
Layer>> blending option

GRADIENt OVERLAY >> SOFT LIGHT >> Geser sedikit

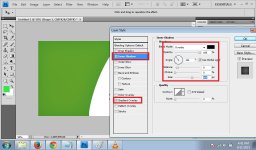
INNER SHADOW >> OVERLAY >> SETTING

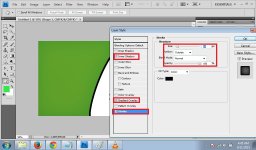
STROKE >> position : Outsude >> setting

FILE >> NEW Setting paper seperti ini
KLIK RECTANGLE TOOL
buat text Nama,Jabatan,Alamat,No Hp,Email
klik 'Convert Point Tool
tarik geser sambil klik CTRL
buat lengkungan >> klik geser tanpa klik CTRL
Layer>> blending option
GRADIENt OVERLAY >> SOFT LIGHT >> Geser sedikit
INNER SHADOW >> OVERLAY >> SETTING
STROKE >> position : Outsude >> setting
Attachments
-
 kartu 7.jpg145.3 KB · Views: 75
 -
 kartu 8.jpg131.8 KB · Views: 84
 -
 kartu 9.jpg139.3 KB · Views: 145
 -
 kartu 10.jpg134.8 KB · Views: 71
 -
 kartu 6.jpg136.3 KB · Views: 93
 -
 kartu 5.jpg133.8 KB · Views: 84
 -
 kartu 4.jpg141 KB · Views: 98
 -
 kartu 3.jpg176.3 KB · Views: 89
 -
 kartu 2.jpg109.8 KB · Views: 96
 -
 kartu.jpg150.4 KB · Views: 92
Muh.Ridwan
New member
terusan
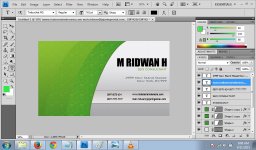
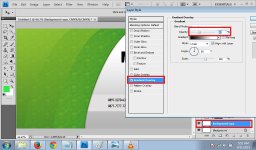
DESIGN KARTU
ganti warna Stroke yg cocok

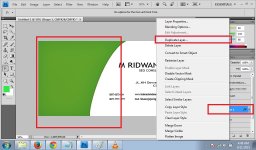
duplicate layer backgroud yang tadi dibuat

kita bikin variasi

klik setelah duplicate lagi lalu kli Layer >> Blending option >> Pattern Overlay >> blend mode: soft light

setelah jadi

buat lagi 'Rectengle Tool' untuk bagian kontak dan ubah warna yang sesuai jangan terlalu mencolok

Kembali ke backbround awal paling bawah
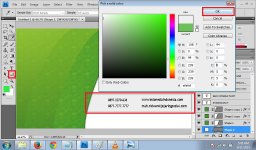
klik layer >> blending option >> Gradient overlay >> normal > geser

Hasil

DESIGN KARTU
ganti warna Stroke yg cocok
duplicate layer backgroud yang tadi dibuat
kita bikin variasi
klik setelah duplicate lagi lalu kli Layer >> Blending option >> Pattern Overlay >> blend mode: soft light
setelah jadi
buat lagi 'Rectengle Tool' untuk bagian kontak dan ubah warna yang sesuai jangan terlalu mencolok
Kembali ke backbround awal paling bawah
klik layer >> blending option >> Gradient overlay >> normal > geser
Hasil
Attachments
Muh.Ridwan
New member
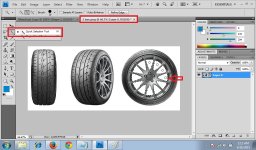
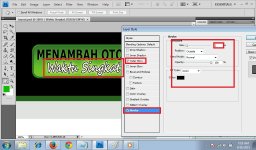
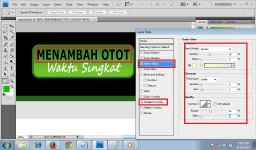
Tutorial Membuat Logo Keren
OTOMOTIF
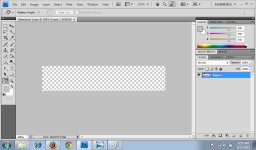
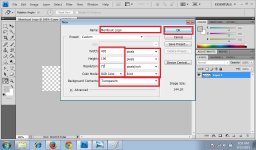
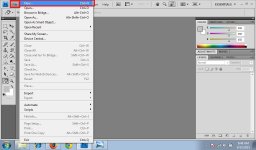
FILE >> NEW

Setting ukuran pixel sesuai yang anda inginkan

jadi

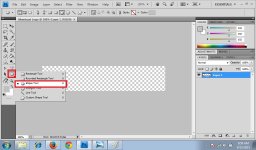
Coba gunakan Ellipse Tool

Anda dapat mengganti warnanya terlebih dahulu sesuai yang anda suka

Kita buat bentuk >> tekan dengan tombol kiri mouse

Hasil

Kita juga dapat menambahkannya sesuai selera kita Rounded Rectangle Tool misalnya

Tarik

Hasil

OTOMOTIF
FILE >> NEW
Setting ukuran pixel sesuai yang anda inginkan
jadi
Coba gunakan Ellipse Tool
Anda dapat mengganti warnanya terlebih dahulu sesuai yang anda suka
Kita buat bentuk >> tekan dengan tombol kiri mouse
Hasil
Kita juga dapat menambahkannya sesuai selera kita Rounded Rectangle Tool misalnya
Tarik
Hasil
Attachments
-
 Membuat Logo 10.jpg117.4 KB · Views: 116
 -
 Membuat Logo 9.jpg119.9 KB · Views: 102
 -
 Membuat Logo 8.jpg124.9 KB · Views: 103
 -
 Membuat Logo 7.jpg117.5 KB · Views: 111
 -
 Membuat Logo 6.jpg114 KB · Views: 109
 -
 Membuat Logo 5.jpg131.7 KB · Views: 107
 -
 Membuat Logo 4.jpg120.8 KB · Views: 123
 -
 Membuat Logo 3.jpg108.7 KB · Views: 115
 -
 Membuat Logo 2.jpg145.5 KB · Views: 103
 -
 Membuat Logo 1.jpg118.3 KB · Views: 138
msyahrul
New member
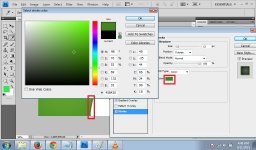
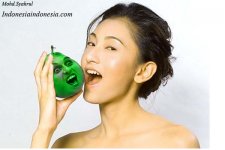
Memasukan Foto Wajah Seseorang Pada Objek Lain, Misal Buah-buahan.
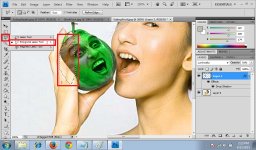
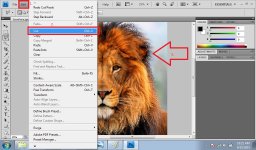
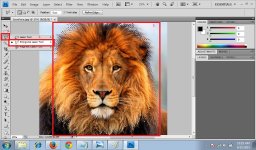
Pertama Gunakan Polygonal Laso tool

Pada Tab, pilih Edit > Cut

Lalu Edit > Paste

Pilih Move > Geser dan tempatkan pada Pbjek yang dituju

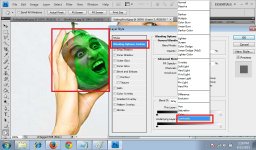
Pilih Blending Option : Costum >> General Blending >Pilih Luminosity > Ok

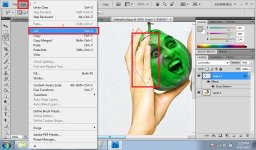
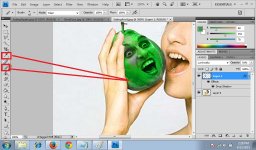
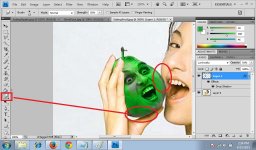
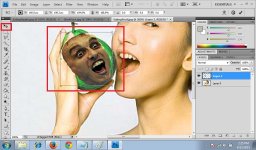
Pilih Polygonal Laso tool > untuk menandai objek yang dituju

Pilih Edit > Cut untuk membuang Objek yang tidak diperlukan

Pilih Smudge Tool > Untuk Menarik warna objek atau menyama ratakan dengan objek lain

Hasil

Pertama Gunakan Polygonal Laso tool
Pada Tab, pilih Edit > Cut
Lalu Edit > Paste
Pilih Move > Geser dan tempatkan pada Pbjek yang dituju
Pilih Blending Option : Costum >> General Blending >Pilih Luminosity > Ok
Pilih Polygonal Laso tool > untuk menandai objek yang dituju
Pilih Edit > Cut untuk membuang Objek yang tidak diperlukan
Pilih Smudge Tool > Untuk Menarik warna objek atau menyama ratakan dengan objek lain
Hasil
Attachments
-
 EatingHumanFruit07.jpg175.1 KB · Views: 53
 -
 EatingHumanFruit08.jpg162.8 KB · Views: 37
 -
 EatingHumanFruit09.jpg162.8 KB · Views: 48
 -
 EatingFruitHASIL.jpg146.4 KB · Views: 57
 -
 EatingHumanFruit06.jpg175.3 KB · Views: 64
 -
 EatingHumanFruit05.jpg185.7 KB · Views: 56
 -
 EatingHumanFruit04.jpg172.2 KB · Views: 72
 -
 EatingHumanFruit03.jpg179.7 KB · Views: 51
 -
 EatingHumanFruit02.jpg153.6 KB · Views: 50
 -
 EatingHumanFruit01.jpg154.6 KB · Views: 66
Last edited:
msyahrul
New member
Memasangkan Wajah Hewan Pada objek lain, Misal Pada Wajah Seseorang (Face HumanAnimal)
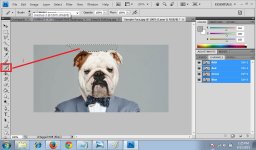
Pertama Gunakan Polygonal Lasso Tool >

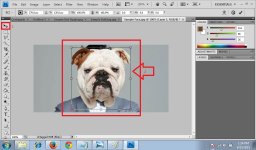
Lalu Crop Bagian yang akan dipindahkan pada objek seperti kepala hewan tsb

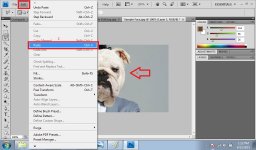
Langkah selanjutnya Open New Picture > Edit > Paste bagian yang Telah di Cut (Crop)

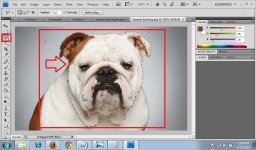
Selanjutnya Gunakan Move> Lalu Resize bagian objek sesuai penempatan pada wajah

Gunakan Polygonal Lasso Tool > lalu tandai bagian yang tidak diperlukan> selanjutnya gunakan Brush Tool untuk enghilangkan objek atau menyamakan warna dengan Background

Gunakan Brush Tool untuk menghapus atau menyamakan objek yang tidak digunakan dengan Background

GUnakan Brush tool untuk menyamarkan warna objek hewan dengan background

Hasil

Pertama Gunakan Polygonal Lasso Tool >
Lalu Crop Bagian yang akan dipindahkan pada objek seperti kepala hewan tsb
Langkah selanjutnya Open New Picture > Edit > Paste bagian yang Telah di Cut (Crop)
Selanjutnya Gunakan Move> Lalu Resize bagian objek sesuai penempatan pada wajah
Gunakan Polygonal Lasso Tool > lalu tandai bagian yang tidak diperlukan> selanjutnya gunakan Brush Tool untuk enghilangkan objek atau menyamakan warna dengan Background
Gunakan Brush Tool untuk menghapus atau menyamakan objek yang tidak digunakan dengan Background
GUnakan Brush tool untuk menyamarkan warna objek hewan dengan background
Hasil
Attachments
-
 FaceAnimalHASIL.jpg56.1 KB · Views: 51
 -
 08.FaceAnimal.jpg158.1 KB · Views: 47
 -
 06.FaceAnimal.jpg136.5 KB · Views: 44
 -
 05.FaceAnimal.jpg141.5 KB · Views: 45
 -
 04.FaceAnimal04.jpg137.4 KB · Views: 44
 -
 03.FaceAnimal.jpg140.2 KB · Views: 50
 -
 02.FaceAnimal.jpg164.1 KB · Views: 43
 -
 01.FaceAnimal.jpg153 KB · Views: 51
msyahrul
New member
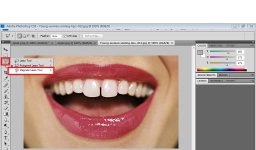
Tutorial Memasangkan Objek Bibir ( Lips ) Pada Buah Apple ( LipsApple)
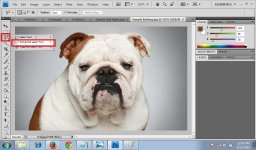
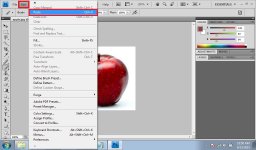
Pertama gunakan Magnetic Lasso Tool >

Lalu tandai Objek yang akan di Cut

Kemudian pilih Edit > lalu Cut bagian yang telah ditandai

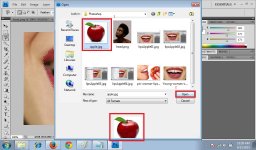
Kemudian Open New Picture dan pilih Objek Lain sperti buah, Misal Apel

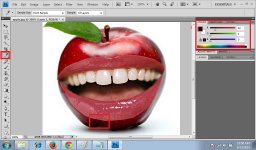
Kemudian pilih Edit > Lalu Paste Objek yang telah di Cut ( Lips ) pada Objek tsb (apel)

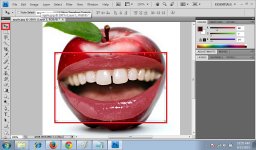
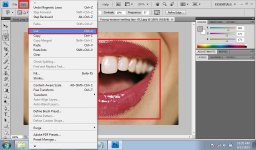
Lalu Pillih Move and Resize objek sesuaikan pada penempatan yang dituju

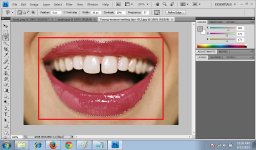
Lalu pilih Eyedropped Tool untuk menyamarkan Objek Lips dengan Aple supaya terlihat lebih nyata

Lalu Pilih Brush Tool dan tujukan Brush Tool pada objek yang akan disamarkan sampai benar benar samar keseluruhan.


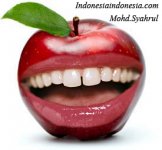
Hasilnya

Pertama gunakan Magnetic Lasso Tool >
Lalu tandai Objek yang akan di Cut
Kemudian pilih Edit > lalu Cut bagian yang telah ditandai
Kemudian Open New Picture dan pilih Objek Lain sperti buah, Misal Apel
Kemudian pilih Edit > Lalu Paste Objek yang telah di Cut ( Lips ) pada Objek tsb (apel)
Lalu Pillih Move and Resize objek sesuaikan pada penempatan yang dituju
Lalu pilih Eyedropped Tool untuk menyamarkan Objek Lips dengan Aple supaya terlihat lebih nyata
Lalu Pilih Brush Tool dan tujukan Brush Tool pada objek yang akan disamarkan sampai benar benar samar keseluruhan.
Hasilnya
Attachments
-
 LipsAppleHASIL.jpg72.7 KB · Views: 45
 -
 lipsApple10.jpg149.7 KB · Views: 41
 -
 lipsApple09.jpg147.6 KB · Views: 44
 -
 lipsApple08.jpg145.4 KB · Views: 46
 -
 lipsApple07.jpg156.3 KB · Views: 43
 -
 lipsApple06.jpg129.2 KB · Views: 44
 -
 lipsApple04.jpg156.3 KB · Views: 54
 -
 lipsApple03.jpg165.2 KB · Views: 43
 -
 lipsApple02.jpg162.2 KB · Views: 44
 -
 lipsApple01.jpg131.8 KB · Views: 41
msyahrul
New member
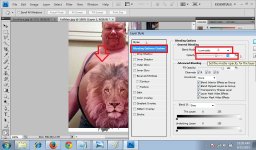
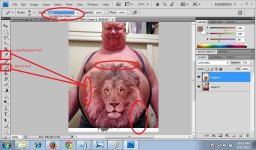
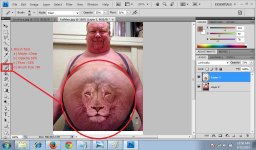
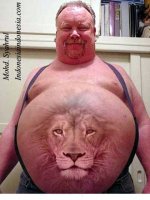
Tutorial Membuat Tattoo Hewan (Lion) Pada Objek lain, Misal Pria Gendut.
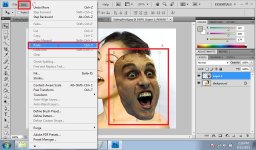
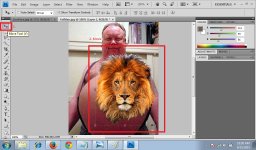
Step one, Gunakan Polygonal Laso Tool > Lalu Tandai Bagian Pada objek yang Akan di Crop (Cut)

Step Two, Choose Edit > Lalu Cut Bagian yang telah ditandai pada Objek tsb.

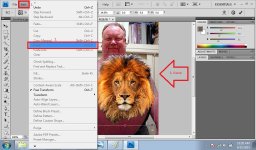
Step Three, Pilih File > Open New Picture > Ambil gambar yang dipilih > Open

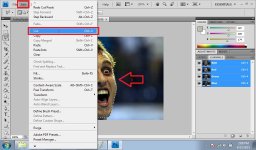
Step Four, Pilih Edit > Lalu Paste objek yang telah di Cut pada Objek lain yang dipilih

Step Five, Choose Move Tool > Lalu geser objek dan sesuaikan pada penempatan objek yang dituju

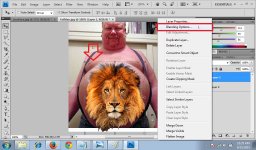
Step Six, Click Layer > dan Pilih Blending Options

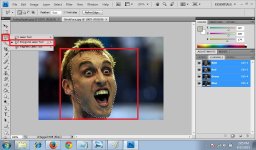
Step Seven, Choose Blending Options : Costume
Edit : a ) Blend Mode : Luminosity
: b ) Opacity 72%
: Click OK

Step Eight, Gunakan Eyedropped Tool lalu tujukan pada objek untuk menyamakan warna pada objek 1 dan 2. > Gunakan Brush Tool dan Ubah Mode : Clear

Step Nine, Pilih Brush Tool > Ubah Mode : Clear > Opacity : 33% > Flow : 31%> Brush Size : 88 > Brush pada bagian yang tidak sama pada objek, lakukan berulang ulang hingga warna dan bagian pada objek sama.

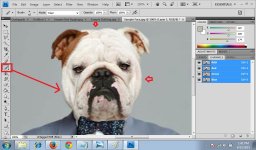
Inilah Hasilnya

Step one, Gunakan Polygonal Laso Tool > Lalu Tandai Bagian Pada objek yang Akan di Crop (Cut)
Step Two, Choose Edit > Lalu Cut Bagian yang telah ditandai pada Objek tsb.
Step Three, Pilih File > Open New Picture > Ambil gambar yang dipilih > Open
Step Four, Pilih Edit > Lalu Paste objek yang telah di Cut pada Objek lain yang dipilih
Step Five, Choose Move Tool > Lalu geser objek dan sesuaikan pada penempatan objek yang dituju
Step Six, Click Layer > dan Pilih Blending Options
Step Seven, Choose Blending Options : Costume
Edit : a ) Blend Mode : Luminosity
: b ) Opacity 72%
: Click OK
Step Eight, Gunakan Eyedropped Tool lalu tujukan pada objek untuk menyamakan warna pada objek 1 dan 2. > Gunakan Brush Tool dan Ubah Mode : Clear
Step Nine, Pilih Brush Tool > Ubah Mode : Clear > Opacity : 33% > Flow : 31%> Brush Size : 88 > Brush pada bagian yang tidak sama pada objek, lakukan berulang ulang hingga warna dan bagian pada objek sama.
Inilah Hasilnya
Attachments
-
 08.HumanLion.jpg185.2 KB · Views: 41
 -
 09.HumanLion.jpg181.5 KB · Views: 48
 -
 10.HumanLion.jpg173.1 KB · Views: 39
 -
 FatManTattoLionHASIL.jpg123.1 KB · Views: 43
 -
 07.HumanLion.jpg194.9 KB · Views: 41
 -
 06.HumanLion.jpg169.2 KB · Views: 48
 -
 05.HumanLion.jpg183.9 KB · Views: 50
 -
 04.HumanLion.jpg151.1 KB · Views: 46
 -
 03.HumanLion.jpg189.2 KB · Views: 49
 -
 02.HumanLion.jpg215.5 KB · Views: 48
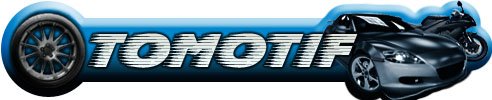
Muh.Ridwan
New member
Tutorial Membuat Logo Keren
OTOMOTIF
FILE >> NEW
Setting ukuran pixel sesuai yang anda inginkan
jadi
Coba gunakan Ellipse Tool
Anda dapat mengganti warnanya terlebih dahulu sesuai yang anda suka
Kita buat bentuk >> tekan dengan tombol kiri mouse
Hasil
Kita juga dapat menambahkannya sesuai selera kita Rounded Rectangle Tool misalnya
Tarik
Hasil
Attachments
-
 Membuat Logo 7.jpg117.5 KB · Views: 41
 -
 Membuat Logo 8.jpg124.9 KB · Views: 35
 -
 Membuat Logo 9.jpg119.9 KB · Views: 35
 -
 Membuat Logo 10.jpg117.4 KB · Views: 36
 -
 Membuat Logo 6.jpg114 KB · Views: 33
 -
 Membuat Logo 5.jpg131.7 KB · Views: 41
 -
 Membuat Logo 4.jpg120.8 KB · Views: 36
 -
 Membuat Logo 3.jpg108.7 KB · Views: 33
 -
 Membuat Logo 2.jpg145.5 KB · Views: 29
 -
 Membuat Logo 1.jpg118.3 KB · Views: 38
Muh.Ridwan
New member
terusan yang diatas
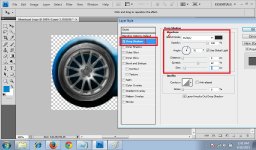
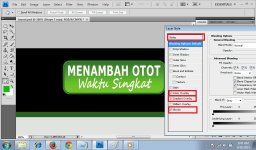
klik kanan pada layar Blending option

Bevel and Embos dan seting untuk menambahkan efek 3D

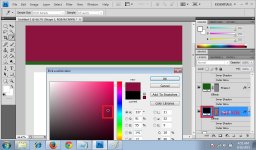
ubah warna yang kurang bagus

anda juga dapat menambahkan efek warna sesuai yg anda mau
Gradient Overlay

dan kotak ini sama seperti tadi Blending option

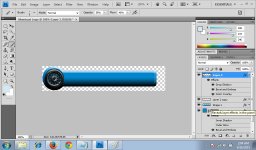
saetting dan cocokan dengan gambar yang bulat tadi

kita tambahkan gambar sesuai selera
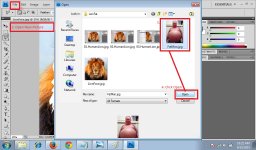
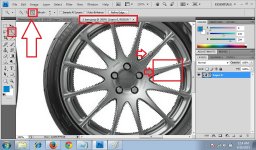
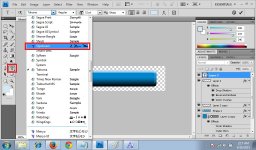
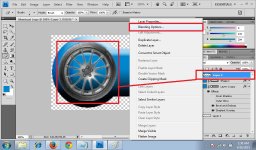
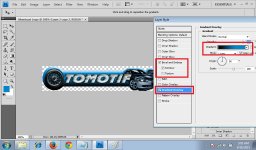
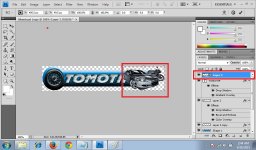
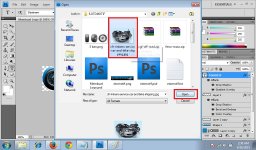
kliK FILE >> OPEN >> KLIK GAMBAR >> OPEN

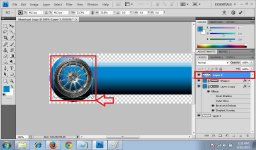
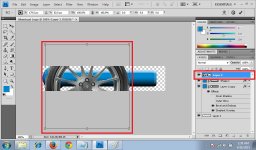
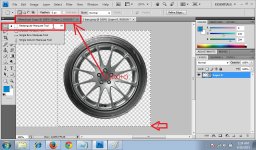
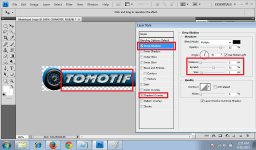
Setelah muncul, kita potong backgroundnya dengan Quick Selection Tool

jika ada seleksi yg berlebihan maka klik tombol pada petunjuk besar diatas untuk mengurangi seleksi dan merapihkannya

selesai

klik kanan pada layar Blending option
Bevel and Embos dan seting untuk menambahkan efek 3D
ubah warna yang kurang bagus
anda juga dapat menambahkan efek warna sesuai yg anda mau
Gradient Overlay
dan kotak ini sama seperti tadi Blending option
saetting dan cocokan dengan gambar yang bulat tadi
kita tambahkan gambar sesuai selera
kliK FILE >> OPEN >> KLIK GAMBAR >> OPEN
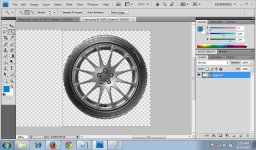
Setelah muncul, kita potong backgroundnya dengan Quick Selection Tool
jika ada seleksi yg berlebihan maka klik tombol pada petunjuk besar diatas untuk mengurangi seleksi dan merapihkannya
selesai
Attachments
-
 Membuat Logo 17.jpg159.7 KB · Views: 38
 -
 Membuat Logo 18.jpg170 KB · Views: 43
 -
 Membuat Logo 19.jpg212.1 KB · Views: 36
 -
 Membuat Logo 20.jpg223 KB · Views: 43
 -
 Membuat Logo 16.jpg128.2 KB · Views: 43
 -
 Membuat Logo 15.jpg143.6 KB · Views: 39
 -
 Membuat Logo 14.jpg132.3 KB · Views: 39
 -
 Membuat Logo 13.jpg133.9 KB · Views: 38
 -
 Membuat Logo 12.jpg151.7 KB · Views: 43
 -
 Membuat Logo 11.jpg140.6 KB · Views: 34
Muh.Ridwan
New member
terusan diatas
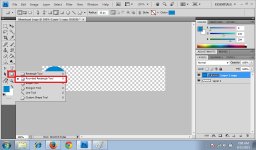
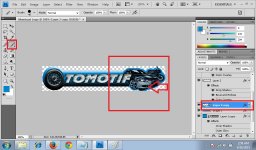
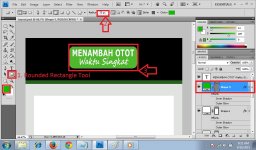
klik Rectangular Marquee Tool >> block gambar lalu copy (CTRL+C) dan simpan ke windows sebelah

klik (CTRL+V) maka gambarpun muncul

pekecil dan rapihkan pada background yang cocok

anda juga dapat mengedit gambar tersebut agar lebih cocok dengan backgroundnya
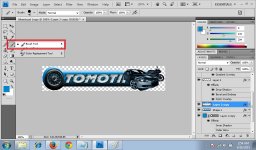
klik kanan Blending Option

Drop Shadow untuk bayangannya

hasil

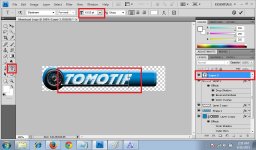
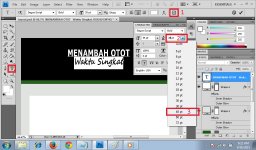
tambahkan text sesuai yg diinginkan,
tapi jika text photoshop tersebut tidak lengkap dan tidak ada pilihan yang anda suka maka anda dapat menambahkannya

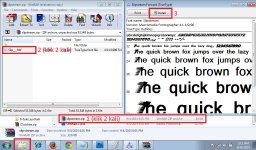
tambah jenis Font jika perlu, sesuai tema logo, dalam hal ini Otomotif, kita pakai font SlipStream , download disini

maka otomatis akan muncul di menu Font dan pilih

ketik

klik Rectangular Marquee Tool >> block gambar lalu copy (CTRL+C) dan simpan ke windows sebelah
klik (CTRL+V) maka gambarpun muncul
pekecil dan rapihkan pada background yang cocok
anda juga dapat mengedit gambar tersebut agar lebih cocok dengan backgroundnya
klik kanan Blending Option
Drop Shadow untuk bayangannya
hasil
tambahkan text sesuai yg diinginkan,
tapi jika text photoshop tersebut tidak lengkap dan tidak ada pilihan yang anda suka maka anda dapat menambahkannya
tambah jenis Font jika perlu, sesuai tema logo, dalam hal ini Otomotif, kita pakai font SlipStream , download disini
maka otomatis akan muncul di menu Font dan pilih
ketik
Attachments
-
 Membuat Logo 27.jpg170.3 KB · Views: 32
 -
 Membuat Logo 28.jpg231.6 KB · Views: 40
 -
 Membuat Logo 29.jpg168.5 KB · Views: 36
 -
 Membuat Logo 30.jpg148.3 KB · Views: 36
 -
 Membuat Logo 26.jpg134.1 KB · Views: 34
 -
 Membuat Logo 25.jpg167.7 KB · Views: 31
 -
 Membuat Logo 24.jpg186.5 KB · Views: 33
 -
 Membuat Logo 23.jpg163.8 KB · Views: 37
 -
 Membuat Logo 22.jpg146.9 KB · Views: 34
 -
 Membuat Logo 21.jpg231.6 KB · Views: 36
Last edited:
Muh.Ridwan
New member
Terusan yang diatas
edit text
klik kanan layer text Blending Option >> Drop Shadow >> Gradient Overlay

File >> Open >> Klik Gambar yang yang cocok untuk logo >> Open

perkecil dan sesuaikan

Gunakan Brush Tool untuk menambahkan background pada objek dan letakan pada layar sebelum layar objek

lukis

edit hasil lukis backgroundnya
klik kanan layer Blending Option >> Drop Shadow >> Gradient Overlay >> Contout >> setting sebagus2nya

Hasil

edit text
klik kanan layer text Blending Option >> Drop Shadow >> Gradient Overlay
File >> Open >> Klik Gambar yang yang cocok untuk logo >> Open
perkecil dan sesuaikan
Gunakan Brush Tool untuk menambahkan background pada objek dan letakan pada layar sebelum layar objek
lukis
edit hasil lukis backgroundnya
klik kanan layer Blending Option >> Drop Shadow >> Gradient Overlay >> Contout >> setting sebagus2nya
Hasil
Attachments
-
 Membuat Logo.jpg32.6 KB · Views: 33
 -
 Membuat Logo 36.jpg140.6 KB · Views: 39
 -
 Membuat Logo 35.jpg151.1 KB · Views: 41
 -
 Membuat Logo 34.jpg151.7 KB · Views: 36
 -
 Membuat Logo 33.jpg149.9 KB · Views: 39
 -
 Membuat Logo 32.jpg173.2 KB · Views: 36
 -
 Membuat Logo 31.jpg146.8 KB · Views: 40
 -
slipstream.zip33.7 KB · Views: 44
Last edited:
Muh.Ridwan
New member
Membuat Design Layout Minisite
File >> New >> Setting ukuran besar seperti ini

Rectangle Tool lalu buat kotak

klik 2 kali pada layar yang anda buat tadi
anda dapat mengubah warnanya jika anda mau

atau Rectangle Tool klik pada petunjuk tanda 2 tersebut untuk mengganti warna sebelum membuat kotak

tarik

Rectangle Tool buat lagi untul lembar bawah

Rectangle Tool buat lagi agar variasi

klik 2 kali pada layar, mungkin jika anda mau menggantinya lagi


selesai

File >> New >> Setting ukuran besar seperti ini
Rectangle Tool lalu buat kotak
klik 2 kali pada layar yang anda buat tadi
anda dapat mengubah warnanya jika anda mau
atau Rectangle Tool klik pada petunjuk tanda 2 tersebut untuk mengganti warna sebelum membuat kotak
tarik
Rectangle Tool buat lagi untul lembar bawah
Rectangle Tool buat lagi agar variasi
klik 2 kali pada layar, mungkin jika anda mau menggantinya lagi
selesai
Attachments
-
 Untuk situs 10.jpg122.1 KB · Views: 43
 -
 Untuk situs 9.jpg148.5 KB · Views: 36
 -
 Untuk situs 8.jpg149.9 KB · Views: 39
 -
 Untuk situs 7.jpg133.5 KB · Views: 32
 -
 Untuk situs 6.jpg130.6 KB · Views: 33
 -
 Untuk situs 5.jpg129.7 KB · Views: 37
 -
 Untuk situs 4.jpg133.8 KB · Views: 35
 -
 Untuk situs 3.jpg147.4 KB · Views: 37
 -
 Untuk situs 2.jpg136.7 KB · Views: 40
 -
 Untuk situs.jpg144.8 KB · Views: 39
Muh.Ridwan
New member
Tutorial Membuat Header Graphic
Buka Font

Ketik text judul

kita ubah brntuk tulisan yang ada dibawah
Block dan ganti font

klik dibagian atas dan setting untuk mengatur posisi text

klik Rounded Rectangle Tool untuk membuat alas logonya dan gunakan warna yang anda suka

Blending Option Pada alas logo dan edit sebagus2nya
Style >> Color Overlay >> Gradient Overlay >> Stroke

Blending Option Pada text
Outer Glow >> Gradient Overlay >> edit

Blending Option Pada text yang bawah
Outer Glow >> Stroke

Blending Option >> Bavel and Emboss >> Texture >> Gradient Overlay

Buka Font
Ketik text judul
kita ubah brntuk tulisan yang ada dibawah
Block dan ganti font
klik dibagian atas dan setting untuk mengatur posisi text
klik Rounded Rectangle Tool untuk membuat alas logonya dan gunakan warna yang anda suka
Blending Option Pada alas logo dan edit sebagus2nya
Style >> Color Overlay >> Gradient Overlay >> Stroke
Blending Option Pada text
Outer Glow >> Gradient Overlay >> edit
Blending Option Pada text yang bawah
Outer Glow >> Stroke
Blending Option >> Bavel and Emboss >> Texture >> Gradient Overlay
Attachments
-
 Header Graphic 8.jpg158.2 KB · Views: 30
 -
 Header Graphic 7.jpg164.8 KB · Views: 35
 -
 Header Graphic 6.jpg160.1 KB · Views: 34
 -
 Header Graphic 5.jpg153 KB · Views: 33
 -
 Header Graphic 4.jpg162.8 KB · Views: 31
 -
 Header Graphic 3.jpg178.4 KB · Views: 41
 -
 Header Graphic 2.jpg141.7 KB · Views: 32
 -
 Header Graphic 1.jpg169.9 KB · Views: 31
 -
 Header Graphic 9.jpg156.5 KB · Views: 34
Last edited: